Excess humidity in your home can lead to a myriad of problems, from uncomfortable stickiness and musty odors to more severe issues like mold growth, dust mite proliferation, and even structural damage. While portable dehumidifiers offer localized relief, a whole home dehumidifier provides a comprehensive and efficient solution for maintaining optimal indoor humidity levels throughout your entire living space. Integrating seamlessly with your existing HVAC system, these units offer superior performance, energy efficiency, and convenience. But how exactly do you install a whole home dehumidifier to ensure maximum effectiveness and longevity? This guide will walk you through the essential steps, considerations, and best practices for a successful installation, ensuring your home remains healthy and comfortable year-round.
Why is a Whole Home Dehumidifier a Smart Investment for Your HVAC System?
Understanding the benefits of a whole home dehumidifier highlights its value beyond just removing moisture. It’s an investment in your home’s health, comfort, and energy efficiency.
•Consistent Humidity Control: Unlike portable units that only affect a single room, a whole home dehumidifier works with your HVAC system to regulate humidity evenly across all connected spaces .
•Improved Indoor Air Quality (IAQ): By keeping humidity below 60%, you significantly inhibit the growth of mold, mildew, and dust mites, which are common allergens and irritants . This leads to cleaner, healthier air for your family.
•Enhanced Comfort: Lower humidity makes your home feel cooler at higher temperatures, allowing you to set your thermostat a few degrees higher in summer, potentially reducing cooling costs without sacrificing comfort.
•Energy Efficiency: A dedicated whole home dehumidifier is often more energy-efficient than running your air conditioner constantly to remove humidity. It can remove moisture without overcooling your home.
•Protection for Your Home and Belongings: Reduced humidity protects wood floors, furniture, electronics, and other valuables from moisture-related damage like warping, cracking, and corrosion.
•Quiet Operation: Integrated units are typically much quieter than portable dehumidifiers, as they are often installed in utility spaces or basements, away from living areas.
What Preparatory Steps Are Essential Before Installing Your Whole Home Dehumidifier?
Proper preparation is key to a smooth and effective installation. Before you even unbox your new unit, several critical steps need to be addressed.
Have You Chosen the Right Whole Home Dehumidifier for Your Space?
Selecting the correct size and type of dehumidifier is paramount. Factors to consider include:
•Home Size (Square Footage): Dehumidifiers are rated by their moisture removal capacity (pints per day). Match this to your home’s square footage and typical humidity levels.
•Climate: Homes in humid climates will require a higher capacity unit.
•Basement/Crawl Space Conditions: If your basement is particularly damp, it might influence the unit’s sizing.
•HVAC System Compatibility: Ensure the dehumidifier is compatible with your existing furnace or air handler.
What Tools and Materials Will You Need for the Installation?
Gathering all necessary tools and materials beforehand will save time and prevent interruptions. Typical items include:
•Safety Gear: Gloves, safety glasses.
•Measuring Tools: Tape measure, level.
•Cutting Tools: Tin snips, utility knife, reciprocating saw (for ductwork).
•Fastening Tools: Drill, screws, duct mastic or foil tape.
•Ductwork Components: Flexible ducting, collars, elbows (if needed).
•Drainage Components: PVC pipe, fittings, P-trap, condensate pump (if gravity drain isn’t feasible).
•Electrical Supplies: Wire strippers, electrical connectors, appropriate gauge wire, possibly a dedicated circuit.
•The Dehumidifier Unit: Your chosen whole home dehumidifier.
Step-by-Step Installation Guide: How Do You Integrate a Whole Home Dehumidifier into Your HVAC System?
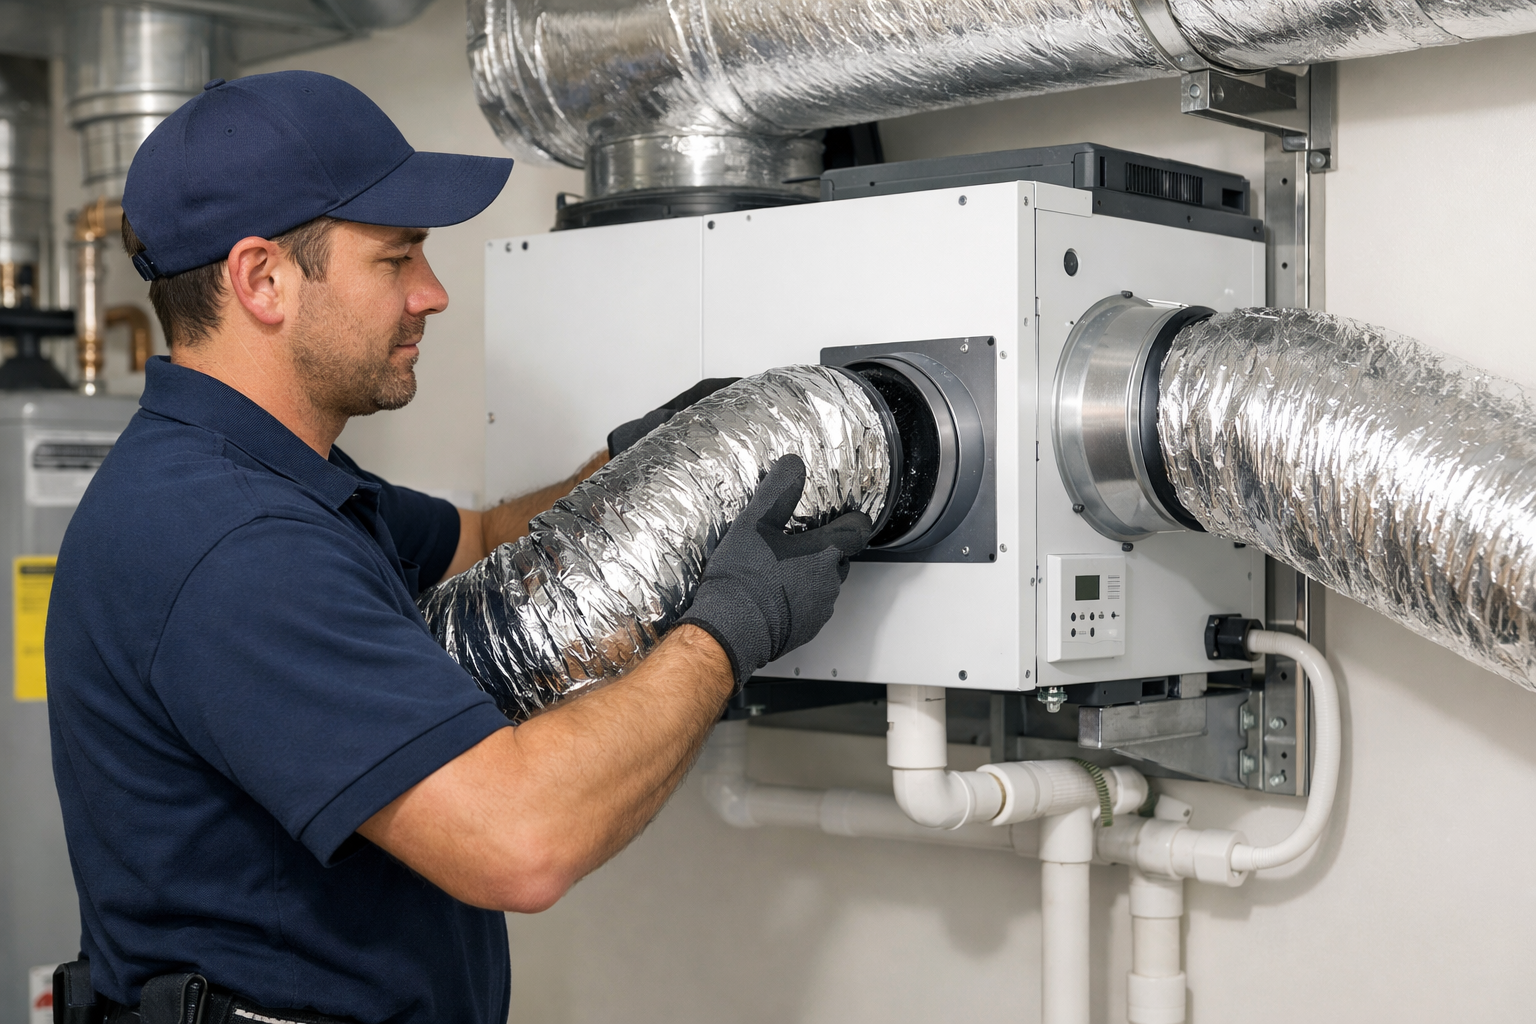
Installing a whole home dehumidifier typically involves connecting it to your existing HVAC ductwork and setting up a drainage system. While professional installation is often recommended, understanding the process can empower homeowners.
Step 1: Where is the Optimal Location for Your Dehumidifier Unit?
The ideal location is usually in a utility closet, basement, or attic, close to your furnace or air handler. It should be easily accessible for maintenance and have sufficient space for duct connections and drainage. Ensure it’s on a level surface.
Step 2: How Do You Connect the Dehumidifier to Your HVAC Ductwork?
This is the most critical part of the installation, involving modifications to your existing ductwork. There are generally two common methods for integration:
•Dedicated Return and Supply: This method involves drawing humid air from the main return duct, dehumidifying it, and then sending the dry air into the supply plenum (the main duct that distributes conditioned air). This is often considered the most effective method .
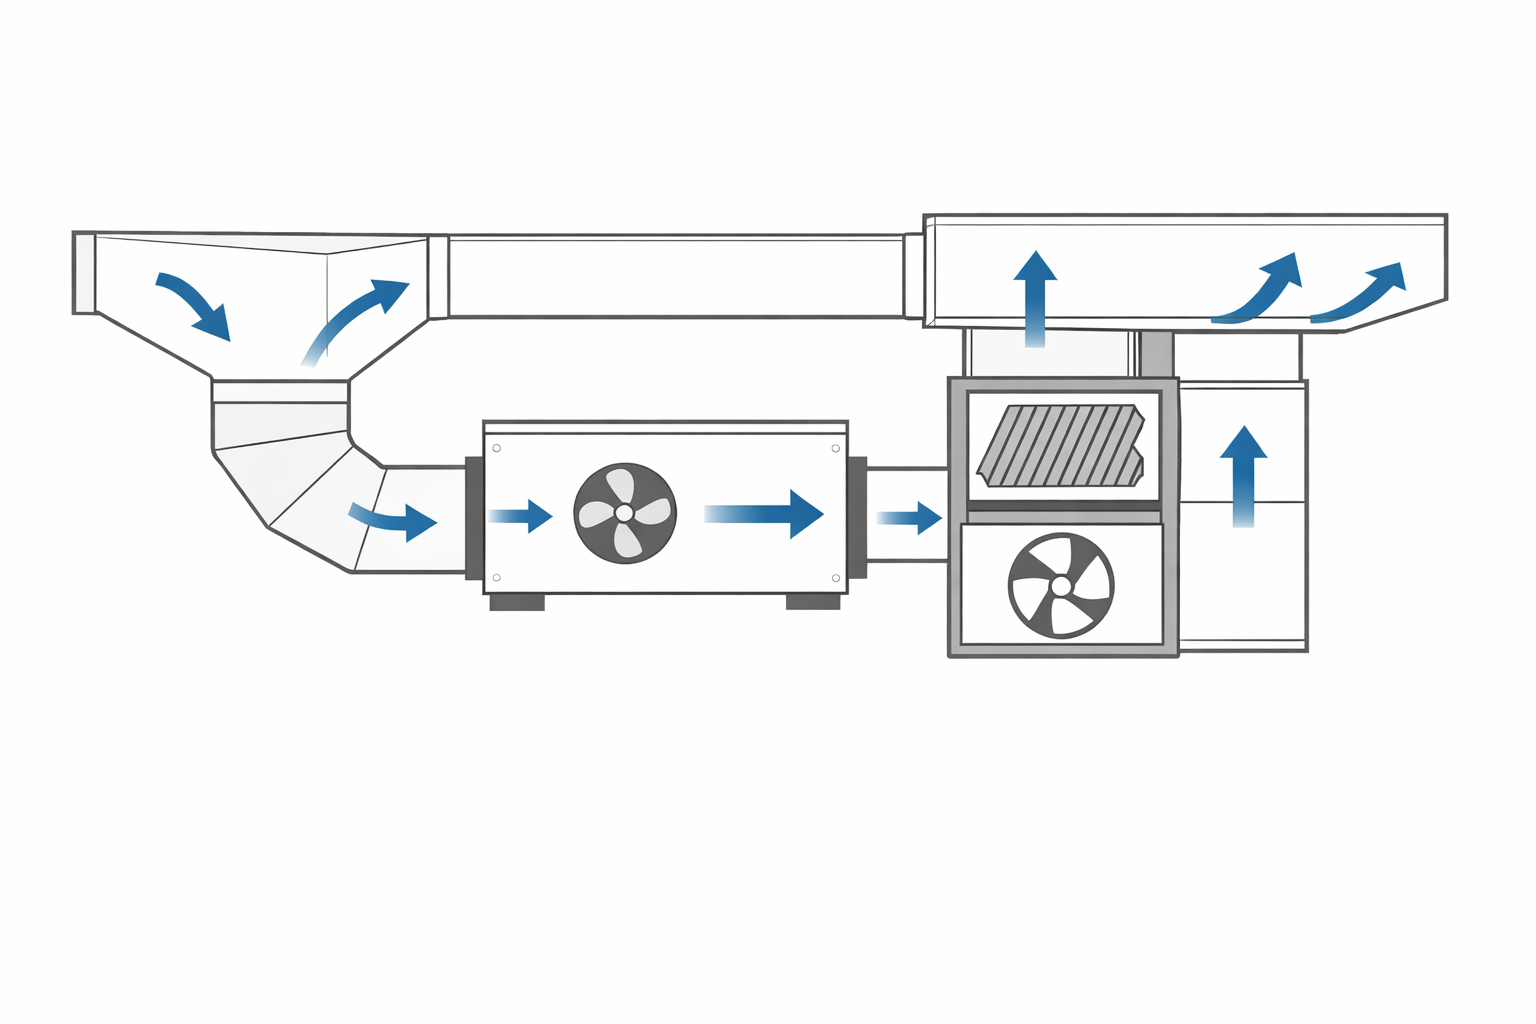
1.Cut Openings: Carefully cut two openings in your HVAC ductwork – one in the main return duct and one in the supply plenum. These openings should match the size of the dehumidifier’s duct collars.
2.Attach Collars: Secure the duct collars to these openings using screws and seal them with duct mastic or foil tape to prevent air leaks.
3.Connect Ductwork: Use flexible insulated ducting to connect the dehumidifier’s intake to the return duct collar and its output to the supply plenum collar. Ensure connections are airtight and ducts are properly supported.
•Return-to-Return (Bypass Method): In this simpler method, the dehumidifier draws air from the return duct, dehumidifies it, and returns the dry air back into the same return duct. While easier to install, it may be less efficient in distributing dry air evenly throughout the home.
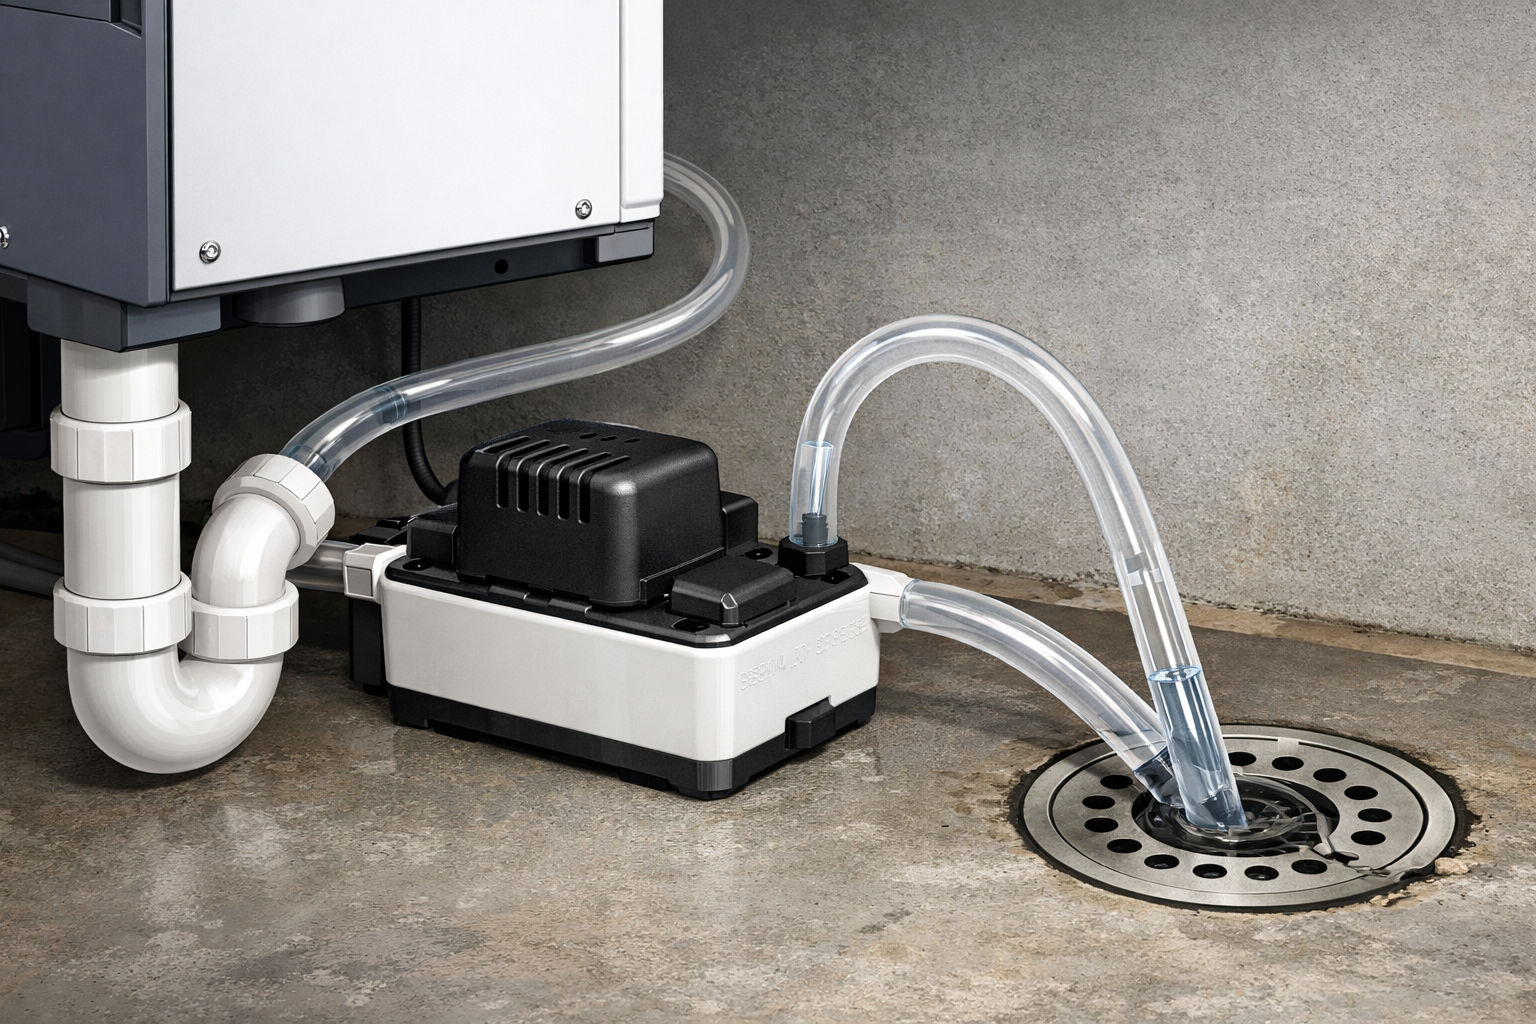
Step 3: What is the Best Way to Set Up the Drainage System for Continuous Operation?
Whole home dehumidifiers produce a significant amount of condensate, requiring a continuous drainage solution.
1.Gravity Drain: If your dehumidifier is located above a floor drain or utility sink, you can connect a PVC pipe directly from the unit’s drain port to the drain, ensuring a continuous downward slope for gravity flow. Install a P-trap to prevent odors from entering the unit.
2.Condensate Pump: If a gravity drain isn’t feasible, a condensate pump will be necessary. This pump automatically collects the water and pumps it through a small tube to a higher drain point, such as a laundry standpipe or utility sink.
Step 4: How Do You Handle the Electrical Connections Safely?
Electrical work should always be approached with caution. Consult your dehumidifier’s manual for specific electrical requirements.
1.Dedicated Circuit: Many whole home dehumidifiers require a dedicated 120V or 240V circuit. If one isn’t available, you may need to have an electrician install one.
2.Wiring: Connect the dehumidifier to the power supply according to the manufacturer’s instructions and local electrical codes. If you are unsure, it is highly recommended to hire a licensed electrician.
Step 5: What are the Final Steps for Testing and Calibration?
Once the physical installation is complete, it’s time to power up and test.
1.Power On: Turn on the power to the dehumidifier and your HVAC system.
2.Check for Leaks: Inspect all duct connections and drainage lines for any leaks.
3.Set Desired Humidity: Use the unit’s control panel or your smart thermostat to set your desired humidity level, typically between 40-55% relative humidity .
4.Monitor Performance: Over the next few days, monitor the humidity levels in your home to ensure the system is operating effectively. Adjust settings as needed.
Professional Installation vs. DIY: Which Path Should You Choose?
|
Aspect
|
DIY Installation
|
Professional Installation
|
|
Cost
|
Lower initial cost (saving on labor)
|
Higher initial cost (includes labor)
|
|
Complexity
|
Requires significant technical knowledge, tools, and time
|
Handled by experienced technicians, minimal effort for homeowner
|
|
Risk
|
Higher risk of errors, improper sizing, or safety issues
|
Lower risk, ensures correct installation and adherence to codes
|
|
Warranty
|
May void warranty if not installed correctly
|
Typically maintains warranty, often includes installation guarantee
|
|
Performance
|
May be suboptimal if not properly integrated or sized
|
Optimized for peak performance and efficiency
|
|
Time Commitment
|
Significant personal time required
|
Minimal time commitment from homeowner
|
|
Best For
|
Experienced DIYers with HVAC knowledge and proper tools
|
Most homeowners seeking reliable, efficient, and warrantied installation
|
While a DIY approach can save money, the complexity of integrating a whole home dehumidifier with your HVAC system often makes professional installation the more prudent choice. Professionals ensure proper sizing, correct duct connections, and adherence to all safety and building codes, maximizing your investment and ensuring optimal performance.
Conclusion: Embrace a Healthier Home with a Whole Home Dehumidifier
Installing a whole home dehumidifier is a significant step towards creating a healthier, more comfortable, and energy-efficient living environment. By understanding the installation process, whether you choose to tackle it yourself or opt for professional assistance, you are investing in long-term moisture control and improved indoor air quality. Remember, a dry home is a healthy home, free from the threats of mold, mildew, and structural damage. Take control of your home’s humidity and enjoy the lasting benefits of a perfectly balanced indoor climate. For high-quality dehumidifier solutions, explore Cetusdry’s products.
FAQ:
What is the ideal humidity level for a home?
The ideal indoor relative humidity level for most homes is between 40% and 55%. Maintaining this range helps prevent mold growth, dust mites, and discomfort, while also protecting your home’s structure and furnishings .
Can I install a whole home dehumidifier myself?
While it is technically possible for experienced DIYers with a strong understanding of HVAC systems and electrical work, professional installation is highly recommended. Improper installation can lead to inefficiencies, system damage, or safety hazards.
How long does it take to install a whole home dehumidifier?
The installation time can vary depending on the complexity of your HVAC system and the chosen integration method. Typically, a professional installation can take anywhere from 4 to 8 hours.
Does a whole home dehumidifier replace my air conditioner?
No, a whole home dehumidifier does not replace your air conditioner. They serve different primary functions. An air conditioner cools your home and removes some humidity as a byproduct, while a dehumidifier’s sole purpose is to remove moisture from the air, often without significantly changing the temperature. They work best in conjunction to provide optimal comfort and air quality.
What maintenance does a whole home dehumidifier require?
Regular maintenance typically includes cleaning or replacing air filters every 3-6 months, inspecting the condensate drain line for clogs, and ensuring the unit’s exterior is clean. Annual professional servicing is also recommended to ensure optimal performance and longevity.